If you like my work, buy me a coffee:

2021/06/01

Project Cyber Wizard - Wearable Glowy Technology - Part 1

Years ago, I was a Green Cloaks LARP regular. I left the main system because of safety concerns but maintained close friends in my old faction and went to one of their Sanctioned events before the plague struck. It turns out the game is still quite enjoyable when it's run by a different team. GC's unique game system has driven my development cycle for many a year and the those developments underpin the core of my design philosophy. The potential for 14 hour long play sessions in an immersive world where you have to eat, drink and fight make for some interesting kit choices. Long set piece battles where you're engaged for 2-4 hours at a time mean reliability becomes king as well as storing all the ammunition to keep blasters fed for that time. Multi-hit point opponents result in engagement strategies that require higher volumes of foam on target can be ported over to more regular Nerf wars where you can modify that discipline into a suppressive fire and manouvre doctrine. Plus the players are much more timid under fire. The average LARP player has a lot invested in their character in terms of time, narrative and the like so they can be a bit more hesistant to take the initiative and engage the opponent. Being around a player base like that readily teaches a powerful lesson in tacticial initiative and playing a little more aggressively. Coupled with multi-HP characters, you can charge down sentry gun positions in a Big Damn Hero moment, end up under the window of their fortified point with the gun unable to pivot down before popping a grenade over the window sill and clearing the room with boomy. It's an experience like no other and I've always played combat focused characters that lend firepower to a melee focused regiment.

What GC also has, however, are Adepts. Essentially, these are cybernetically enhanced soldiers who would probably be equivalent to space wizards. I've always wanted to play one but I've never had the hard skills to put together the kit necessary to match my image of what one of these soldiers should look like. Until now. I have a 3D printer, I have a lot of sewing machine experience and I can solder and code Arduino. I have been refining these skills over the course of the pandemic and I've now sketched a vision of the character, his personality and his vision.

The Character Build:

With the way that GC works, you have skill points to spend on your character. I elected early on that I wanted a shooty focused character that could force multiply using a combination of shooty and space magic to disrupt and control the flow of a fight. I have a number of options as an Adept from causing enemies to run away in fear, to causing them to fall over as though they've been hit by a giant hammer or just simply magically removing 1HP from them with 3s of chanting or being able to heal with a laying of hands. The magic missile 1HP removal is out because you only get 15 focus points to cast your magic a day so that equates to a single magazine worth of damage which I could put out in less than 3s with a semi-auto rifle. Fear is relatively easy to counter in the system and only forces the opponent to run away for a little bit simply delaying the problem. I tussled between healing and knocking people on their arses for a while. In the end, I went for knocking people on their arses. I can cast a Knockdown call 15 times a day which forces folks to take a knee as stunned for 3s. In that time, I'm able to either deal with another problem or, more reaslitically, dump enough ammo into the target that they don't get back up*. There are in-game items that let me stabilise dying casualities and my plan is to trade, borrow and scrounge for lots of those so I can do the healing hands thing (sort of) without having to spend points on it.

Now, Adepts don't get the ability to use Rifles as part of their basic make up so I'd have to spend 3 points out of my original 4 to take it in order to be able to run anything appropriately semi-automatic. That would leave one point for spells and by taking Mind, I'd gain the ability to knock people on their arses. This leaves my character with very serious vulnerabilities. I cannot use a melee weapon bigger than an 18" dagger, I can only use a single shot side arm and given the fact mages don't wear armour (even in this system), I've got 5 hit points before I go over. That's 5 points where you can take full auto bursts to the chest and you'd be like paper. To make the character work, I'm going to need to stick close with my fellows and act like that force multiplier.

My combat styling, therefore, would be close in with the melee fighters. I'd be lighting up targets of oppurtunity and knocking them over for the melee guys to wade in and finish them off. I'll be moving all over the battle line to problem areas to bust problems and generally have to be very mobile. I think that nomadic ranger type styling is something I could really riff of in the story part of things. Adepts are weird creations anyway so the idea of a ranger type of character who appears out of the mists, fixes things and moves would be pretty neat. Background wise, the current narrative within the GC universe is that the task forces' numbers have been scattered and ordered to go to ground for in-game reasons. I like the idea of coming in as an outsider type who links up with the regiment because they're the nearest friendlies and just sort of tries to fit in. Narratively, I think riffing on themes of isolation, reintegration and trauma would be a strong start. We tell stories from our own experience and imagination and I think that idea of longing for home and joining a band of folks to get there is something I'd like to explore.

*Important note here: In actual practice, I would probably break character at this point to agree with the player who is playing my opponent to simply fall over dead and empty the appropriate amount of darts into the floor rather than unload at close range into the target. Politeness and etiquette trump any power fantasy you might have.

The Equipment:

So with the idea of a cyber combat wizard in mind, I started looking around. With these sorts of space mages, you're not looking at a heavily armoured build. Ideally, you'd want to go more with a flowing robe and then build out from there. GC's rules require that Adepts have something cybernetic lookign on their faces to denote that they're infact space wizards. I thought I'd extend that and opt for an entire glowing hood using LEDs to produce a more impactful effect. I wanted and LED system in my palm so I can have glowing lights when casting spells and given that Adepts are a living weapon, I elected to have something on my blaster that would light up when I gripped it. The idea being that the eldritch energy I'm drawing from the other plane flows through me and through my weapon.

I'll end you! And I'll do it in my PJs!


 I needed to start simple. I needed a hooded robe that would sit under any webbing and pouches I needed to carry for anything else. To that, it all started with a dressing gown pattern from Simplicity. Specifically pattern 3575. I opted for a DPM outer to fit with the regiment's aesthetic and a black lining to give me black facings that I could pin badges, do hand embroidery and generally enhance the look as the character begins. Cotton with a side helping of cotton was the choice because it's cheap and cheerful. If this was a longer term character, I'd have probably invested in the lighter option of linen.


 I made the hood as large as possible, the idea being that surplus fabric would be able to fold around the shoulders to soften the profile and look more cyber wizardy. I've sewn Velcro loop tape into the lining of the hood to allow me to attach the mesh of LEDs that will form the lighting effects. The sleeves are long but I've opted to have them folded back so they won't get in the way. I like the idea of pressing them so they have a crease. It's a small touch but any one who's ever served will tell you that they iron everything, even their t-shirts (my Dad was always a dab hand as a result when we were kids).

Pre-lining...


The longer this pandemic goes on, the less able I am to do photos...

Under the robes will be my standard set of DPM greens because they're utilitarian, durable and fit with the theme of the regiment. I'm thinking of adding some waist sashes in bright colours depending on what I decide to do with the character's backstory. There's an enclave of warrior adepts that I'm looking at joining and having sashes in the appropriate colours for their various schools would be cool.

Equipment wise, I will follow on from the developing multi-phase approach that I've been working on in previous posts. Like my old character, I'll have a skirmish or battle belt with every day carry and lightweight engagement stuff on it. A couple of magazines, some in-character magical and medical equipment and a load of spare ammo plus water will all I'll need for the permanent carry. Then I can put the 18 pattern and haversack on for major fights without needing to carry it all the time.

One important thing about this build, though is that the radio will be carried permenantly and the head band piece will carry a piece of hook Velcro that will keep the hood up. That way, the LEDs will have a permenant back drop and I can use the radio ear piece as a mounting point for facial markings that I'll need to spirit gum to my face. I'm thinking of edge lighting some pieces of 3D printed translucent plastic so you get a weird fade effect on one side of the face.

Electronics and power:

I'm not just opting for basic LEDs. The system is designed that I could readily swap out for an off the shelf set of net LEDs if I needed but I wanted to go big or go home with this build. To that end, I'm going to use WS2812b LED strips which are sold by Adafruit as Neopixels. I've cut them down into 38 LED lengths and will sew them so they form a coronal plane across the hood. To control them, I plan to use an Arduino Nano and a LiPo pack on my duty belt. To that end, I've designed a custom board to control the LEDs and do everything I need them to do.


The specifications for the board are as follows:

  • 4-5 input buttons for presets and general input
  • A master power on/off switch to allow the whole system to be turned on and off as needed
  • Stable out put of 5V in order to be able to safely power the LED strips
  • XT plug compatibility for plugging in LiPos
  • A cooling system to keep the system cool under load
  • A master dimmer option to change the brightness of the LEDs with a simple button
  • A master voltage monitor to keep an eye on the LiPo pack I'm using

Optional bits and pieces:

  • Bluetooth compatiblity


Enter the V1 board. I put this together on Eagle and ordered it from China via JLC PCB. There are parts libraries from all over the internet and if you recognise your footprints, thank you for making them freely available. I've gone for entirely through hole components because they're easy to source and easy to solder. The board itself is 100x45mm which is a bit chunky but given the size of the LiPo packs that will power this system and the fact it's belt mounted, it's not that big in the grand scheme of things.

The big LM338 package there gives me up to 5A of current at 5V and I'll put a IRL44ZN MOSFET where the IRF540 package is. That's 49A of continuous current. Past experience has taught me that the LM338 packages get warm under load so I've placed them under a fan and will back that up with a heat sink, too. If a basic 12V fan is too noisy, there are Noctua silent options on the market if I really need them.

The switches at the top of the diagram are the right angled PCB variants and they're surprisingly robust when soldered down. These 5 will form the basis of my inputs and two of them are wired to the Nano's interupts so I have the option of using them for ISRs and funky effects that come with those.

Humble beginnings as I remember to how to solder through hole components...


 At this point, I've begun assembly of the board. It's thrown up some interesting bits and pieces that hadn't been evident in the design process. For example, that Nano's USB port is placed where it can't be readily plugged in so I'll have to either keep the fan somewhere else during testing or unplug and replug the board each time I flash it. We'll see how that goes. Worst case, I can move the button switch and flip the board around. It'll require some major redesign work on the EAGLE end of things but it's not the end of the world.

I've opted for a 90 degree plug in connector for the Bluetooth module so it can be plugged in as needed. It's all wired up in the traces, it's an optional module and won't get in the way.

There's a huge amount still to do on this project. I need to fix the printer before I start on the next phases. I need to design a housing for the main board and power system. The anchor points for the LEDs in the hood need designing and printing. I need to find a way to safely bundle long cables between my belt and the hood and the belt and wrist for the hand LEDs. I've got a while before the next event so I'll keep tinkering and playing. I'll keep posting as it goes.

2021/05/27

'Normandy' Pattern Friction Fit Shingle Pouches

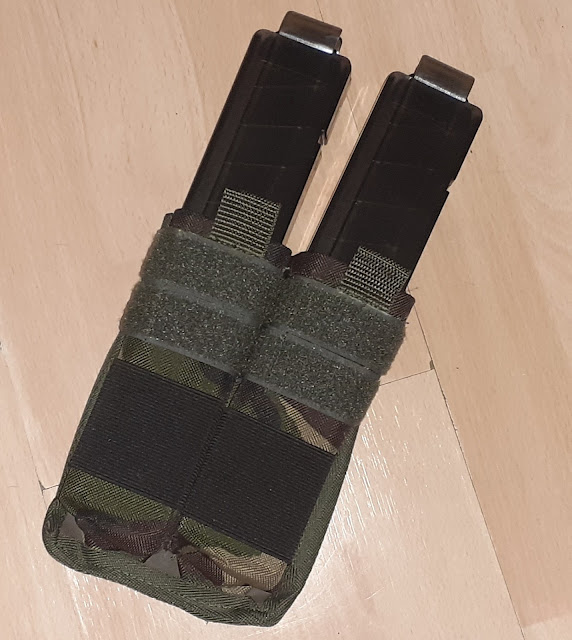
I talked in the Before Times about my magazine pouch doctrine and how 3 deep pouches came to be. I talked in that post about how I intended to use a single depth pouch on a character for a skirmish order. Well, between that post being made and actual deployment, a client approached me asking me for a friction fit pouch for whatever reason. I dutifully obliged but during the work, I realised the client was on to something. For single depth pouches, it makes perfect sense to have friction fit over elastic tops. Flaps still have the advantage of protecting darts but if you're going for rapid access then friction makes a lot more sense.

At the time, I made a few prototypes for the client's order and ended up fielding a full length magazine friction fit double for the event in March 2020. It worked really well, functioning as envisaged as part of the skirmish order and kept the blaster fed in skirmish order.

Orange trimmed single proof of concept I made back in the Before Times
 

Fast forward to now, the plague is subsiding and we're getting back out to games. The twin problems of reloading from prone and a skirmish order have reared their heads again. I'm needing to be able to access magazines when I'm lying in the dirt as the engagement distances are pushed out and dropping the upper load for close order urban work means I need magazines on hand for that work.

Cut the panel a little shorter than I'd have like... Oops...

These use a 40mm base square which results in a sloppy aperture, needs tightening in future
 

This is the initial prototype of the second generation using slightly convservative measures. As you can see, the magazine apertures are a mite larger than they need to be and I'll trim them down in a future iteration. I also under cut the height of the pouch so there's a lot less up top than there ought to be. I'll make them taller in future iterations and it'll cope with longer magazines better, too. The pull tab on the aperture is essential for two reasons. The first being to ensure the pouch keeps the aperture shape and the second being to allow some grab space if you really, really need to ram the pouch home if the elastic is too tight. You don't need to keep the aperture shape with the usual 3 stack magazine pouches because their shape is retained by the fact you should be pulling magazines from the front and returning them to the rear so there is always at least one mag in there to keep the shape.

Do you remember full length darts? I do... Dimly...

This is the full length variant I fielded back in March 2020. It lacks the pull tab because the wider nature of the magazine means it will happily keep it's shape and you can stuff it home without too many issues. The full length variant doesn't do well with inversion but all the tests I've run so far on the Talon variant have been fine with the pouch being inverted. The true test will likely come at the high FPS event on 5th June.

Side by side - latest iteration and the initial prototype I made pre-pandemic

The exploration of this friction fit has given me several ideas. While writing this blog post, I realised that my triple pouches still have a spill problem when lying prone but with a friction fit band, that could be mitigated. A triple pouch with only two magazines in it isn't going to spill as easily if there's something pressing the pouch together. Finding the right balance between retention and speed of reload, however, is going to be critical. As I explained in my blog post on the origin of the triple magazine doctrine, the idea is to have four magazines' worth of ammo on hand for rapid cycling through because if you can't solve an immediate tactical problem with 60-72 rounds then you've got bigger problems. If the elastic strap slows that cycling down any then it might not be worth it for the majority of use cases. Indeed, going prone only really happens at higher FPS games where distance makes it worth it. Otherwise, I spend most of my time kneeling behind cover, cycling through magazines held in place under gravity.

In this photo you can really see why losing your development notebooks is a bad thing

Friction fit pouches also have another use that is beyond my play style. With the announcement of the Dart Zone Pro Tour in late 2021 and 2022, there's likely a use case to be made for 5v5 players using them. These 5v5 tournaments are not my bag but my understanding is that teams are limited to an overall number of darts and the quick, exchange based play will suit friction pouches more readily. Fabric friction fit pouches have the advantage of being a little squishier and better lasting than their 3D printed counterparts plus they won't wear out as quickly as plastic.

I need to iterate on these and produce a final prototype before they can go on the website.

It's an odd feeling to be back developing equipment again. With games starting up, I'm actually having to consider load outs and equipment design again. I was under the impression for a long time that my load was pretty set and I had solved 90% of problems but with a year's break and a different style of game to focus on, there's more work to be done. Keep an eye out here for more as I revisit equipment I've built and used or stuff that I've just straight up developed anew. Remember, all this stuff is focused on high FPS stuff - I'm not sure what I'd even begin to reach for in a lower FPS environement right now!

2021/05/22

Skirmish Belt Prototype

 With only high FPS games running right now, my higher energy load out is getting a lot more attention. After Wickford on 8th May, I realised that a lot of my stuff is sitting far too high on my rig. The battle belt on the 18 pattern is sitting too high where it's locked to the haversack and there's a gap between that and my duty belt. It makes it too diffcult to access the ammo in the dump pouch or the pistol in the holster. I need something lower down to make it work.

Back in the mists of time. Well, March 2020 actually (remember a time before the plague? Yeah...) I had a LARP character that was basically a warrior diplomat that needed a bit more flexibility in his kit. I talked about it a little in this post. Then the battle belt sat below the vest as an auxilliary piece of equipment and the vest could be fitted over the top. The theory worked out very well in practice, I could have a light to medium load out for 'everyday' carry as well as a heavy load for when we were really bringing the thunder. It also worked really well in character because, as a diplomat, you can change up your kit depending on the message you want to send. Sitting down and taking tea with a local tribal chief? Battle belt gets hung on the door peg. Intimidating said locals into fighting with you? Full body armour and combat helmet.

Now, I could have created another battle belt and indeed the end product is probably interchangeable with a battle belt but I wanted to experiment. The battle belt I sewed for the character was a clone of the Condor model because I couldn't get that one in DPM.The issue with that design is that it's very involved and doesn't scale well for production. It has multiple layers of fabric and while it's a solid design, it's not one I want to be repeating. I got talking to another BritNerfer who was looking at rigging belts and the option of a very slimmed down battle belt.

Now, a battle belt has to serve two functions. The first is to carry equipment and the second it to carry in a fashion that is more stable than a duty belt on it's own. With a rigid enough belt, it's possible to just layer another belt over the top and you're good to go. However, that can be uncomfortable and will still allow a degree of lateral movement in the belt itself.

Enter the skirmish belt - so called because it's lighter than a battle belt.


This design uses the same amount of fabric as my flap top magazine pouches at 800x110mm but does have a mesh liner for comfort. I made two prototypes, one with a closed cell foam stiffener and another without. I've not noticed much difference between the two in the testing I've done around the flat, the duty belt over the top is doing plenty as a stiffener.


Philbert hasn't put on a lock down chonk...

The dummy has a wider waist than mine so you can see what less coverage equalling more bending will do for you. I've sewn a 50mm duty belt for this but any Viper or similar belt would do the trick.

Closer view of the interface between the belt and the pouches

The construction is very simple and you can use any 50mm belt to anchor it in place with the provided loops or any MOLLE mounted pouches you've got on there. The other great thing about this design is that it can be shortened or extended to the player's preference. I cut this to 800mm because my waist is 920mm which leaves 50mm for the buckle and 20mm 'give' room. If I were smaller or wanted less coverage, I could trim the panel and make a smaller one. As it was, I thought this might end up serving as the main panel for my full service rig so I made it full coverage. That way, the lesser coverage on the battle belt can be exploited to make a more bending-over-friendly lighter load.

The main sticking point with construction is the MOLLE. It takes time to measure and sew that set of panels so I suspect a typical 800mm belt will cost around £30 with an additional £5 if you want a belt supplied with it.

I'm going to swap the skirmish and battle belts over and see if there's a big difference between the two.

2021/05/18

Resilience, recovery from injury and workman's pride

Content warning: Discussion of injury (no photos)

I've been sewing gear for over 8 years now and it's rare I get an injury. Yesterday, I managed to put my size 16 machine needle through my left index finger, narrowly avoiding the nail bed. It was a through and through so it bled like a nightmare. The machine cycled such that it jabbed me and came to rest in the up position so I didn't have to take the needle out myself. The incident has taught me two things. The first is that while I can deal with slicks of blood, open abdominal wounds and people expiring in front of me, I am very, very squimish when it comes to my own blood. I had to ask my flat mate very nicely to help me dress the wound (under my direction) because I was on the verge of passing out. Great. Really adds to your street cred when you go green at the sight of a small wound to your finger. No one tell my work colleagues!

Second, it taught me about resilience. It's been a long couple of weeks with starting a new job and running Foam Fest Live 2 at the weekend. Getting back to games and generally juggling life has been a bit of an adjustment and I'm still finding my feet. The order I was working on was a complex custom commission and it had taken a lot of my time. The piece I was working on was the second generation that I had picked up again after a couple of weeks mulling over solutions to a particular problem. The small tacking stitches at the bottom of the pouch where I expected there to be highest risk of injury, however, weren't the ones that caught me out. It was a simple corner stitch for the flat loop Velcro you can see in the photo above. I sewed the short edge, lifted the foot and turned the piece, dropped the foot and failed to get my finger out the way before my foot engaged the pedal to move the needle. Punch. Through and through, in one side and out the other. Thankfully, I missed the nail bed and I was using my big size 16 Cordura needles. I think had it been a smaller needle for one of my non-tactical gear projects or had been 3mm to the left, it would have broken inside my finger and I would be having a very different discussion right now. As it was, I have enough dressings and gear on hand to clean and dress it properly thus saving the NHS the effort and my own blushes because my local hospital is part of the same Trust that I work for in my day job. I patched myself up and had to take the rest of the afternoon off because I physically couldn't operate the machine with a giant dressing on it.

Sorry, boss... I can't come into work: my finger looks like something from ET

 I got back on the machine this morning and I was very nervy to start with. I finished up the custom commission for the order I was working on without incident. It took a lot more time than usual with me being slow and second guessing everything. The extra mental effort also sapped a lot of the 3D spatial thinking that custom work needs. It can take a lot of bandwidth to fold fabric in your head space to allow for machining and ensuring things turn out the right way. If that bandwidth isn't available then I fall back on good old fashioned try, fail, repeat. Fortunately, Cordura is very resilient stuff and can take being pulled apart multiple times. What should have taken 45m took closer to 3 hours as I worked through pretty much every iteration until I got a pair of pouches that I was happy met the specification.

Beware: Velcro loop tape may bite
 

Then I went onto something slightly simpler. Still custom but only in trim - I put together a drop-leg pouch and I was very pleased with the results. Inordinately pleased. I realised afterwards it's because I had overcome my initial hesitation and that by being back on familar ground I had put my confidence back together and got moving again. It's a strange feeling to be reminded of my pride in my work but sometimes I need that reminder.

It would have been a nightmare if I had bled on this particular trim!
 

So why am I sharing this one on the blog? Well, because I'm one of the more experienced machinsts in this particular niche field and if I can balls up so spectactularly and learn from it then I hope others can, too. A lot of us have been out of the hobby this past year or so and there will be skill fade there as a result. I think coming back into games and back to the modding bench, we're all going to be a bit rusty and make expensive mistakes. It's OK to balls up and feel like you've somehow lost it. Get back on the horse with something familiar and simple. Build back up and remember that we do this for fun but there's always growth and development there. This hobby can teach us many hard skills but occasionally it can just serve to remind us of community, shared spirit and our own innate resilience.


Oh and to clarify, at no point was I at risk of bleeding on the piece. My hand moved out of the way pretty sharpish under reflex and I had indirect pressure on my finger before I could anything other than leak over my hand. I've worked with enough bodily fluids this past year to know how to stop them getting on the wrong things...

2021/05/09

After Action Report: Splatoon High FPS 8th May

 8th May saw my first post lock down return to the field after the second COVID peak. I had originally intended to go to April's event but it turns out that ICU shifts the night before events isn't such a good idea. I reviewed my kit again ahead of May with a slightly heavier rig in mind. 

Splatoon's terrain is mostly pseudo-urban with a container structure dominating the centre of the top field with cars and other odds and sods providing cover on the lower tier. They have a couple of FFS like side fields with woods but we spend most of the time there in the container space. With April, I opted for a lighter load out for transport considerations but after I realised that some Green Cloaks events will be on later in the year, I bought a huge 28" suitcase and rifle back to increase my public transport carry capacity so I could get out and about with more gear. To that end, I went heavier for the May event.

April's load out as detailed in my last post
May's load out


So this is back to my more traditional 18 pattern with a Haversack and Talon magazine pouches up front. It has everything the April equipment load has but with key additions.

The Haversack can carry a full day's fighting load of food, tools, smokes and spare ammo. I've added the helmet for filming with as well as a trauma pouch (because it's cool!). The  battle belt at the core has space for an addtional 2 Talon hex stack pouches when I finally get around to buying the remaining Talon magazines I need. The 18 pattern can be donned and doffed like a jacket so it doesn't take long to get access to things in the pack.

(C) 2021 Games of Foam, Reused with permission

You get a sense of how everything hangs together in this photo taken by the Games of Foam event organisers. It does give me a little bit of a turtle soft shell at the back with the haversack but no worse than the guys carrying HPA bottles. The great thing about that shot, though, is that I was wearing my DPM Goretex jacket because of the rain and the wind earlier in the day. It doesn't get used very often and gets thrown on over my DPM work shirt with all it's patches and colour. It makes the gear look a lot more low profile than if I had bare skin and velcro pathces all over my arms.

Kit Review:

In the main, the kit isn't anything new with most of it having been field tested before the plague. The new shoulder pads did a good job of distributing weight and providing excellent wiring channels for my water, comms and slings. They're also a great spot to grip when lifting the rig and putting it on.

The major problem I had is that the battle belt panel was sitting too high to comfortably use the side arm holster or the dart dump pouch. They're sitting really high up in my arm pit and that's really annoying. I'm looking at ways to effectively drop the belt line but most of them don't really work while retaining stability in the system and access.

In my reflections on shingles back in October 2019, I took a detour via battle belts and it occurred to me that I could kill two birds with one stone here. One of the draw backs to the 18 Pattern and Haversack that I have here is that it's very tricky to get access to the pack when I'm wearing my gear. I also don't have a lighter, skirmish option in the event I'm on screening duty or similar. However, when I built Arashi, my LARP heavy fighter I used a battle belt under the vest to allow me the option to have super-heavy and lighter options in a single load out. Now, the battle belt I used for Arashi is the battle belt that I'm using to stabilise the 18 pattern here and I think I'll leave it there. What I can do, however, is place a narrower, 'Skirmish Belt' under the battle belt above and possibly slightly over the duty belt on the waist. On that, I can drop the regular access items like the dump pouch, side arm and possibly water bottle. Then the battle belt as is can be filled with more Talon magazines and possibly low frequency access pouches for things like smokes and thunder flashes. I have skirmish belt prototype kicking around from a discussion with a fellow BritNerfer back during the worst of the plague so I'll pull that out and see what I can get done with it.

Blaster Review:

I took the Gryphon and the Caliburn down to site. I used the Cali to drop a few pot shots at folks but quickly returned to the realisation that I can't function with manual prime blasters. I need to be able to put a burst of shots on target or to be able to suppress a position. I'm not looking to take one or two shots on target. If I'm throwing foam in your direction, it's not because I want to tag you but because I want your head down while someone moves. If I tag you, it's a bonus. I can't do that with single shot. 

First and foremost, we need to solve the Merlin motor melting problem in dual stage cages. After seeing a dual stage Gryphon in the field yesterday, I honestly think that if we solve the motor durability issues, it's going to supplant HPA as my preferred blaster technology. If we can get reliable, durable 250FPS at semi-automatic then those flywheel systems don't have anything like the reliability problems the HPA queens do. I found with the Gryphon yesterday that, once again, I could throw whatever crap darts I wanted to into the mag and it would just feed. I had a couple of stoppages from soiled darts in the Talon itself but a couple of taps on the bottom against the nearest container or piece of cover fixed that problem. If we can't solve brushed motors then dual stage brushless might be the next thing to poke but I want to keep things as simple as possible.

Next, half darts are king. Not because they are necessarily better than full lengths - they get lower FPS in flywheels - but because they are much, much more space efficient. I can carry the same number of darts in the half the space as full lengths. If I'm putting bulk foam on target then so long as they can reach the target, accuracy is less of an issue. I think I saw maybe fewer than 30 full length darts yesterday during my sweeps and it's clear that it's becoming the dominating form factor.

Long term, I want to get a dual stage Tempus built with a cooling system for the motors to prevent failure that will replace the Gryphon as my line rifle for these sorts of games. 250FPS semi-auto in a rifle form factor is the dream. I'll print it in full PETG and go the whole hog. The Gryphon might still have to tag along at places like Splatoon, however, since 250FPS up close in buildings is a bit impolite. The Caliburn still has a special place in my heart so I think I'll still HPA it as planned and use it for a 300FPS single shot sniper rifle. My little stock Firestrike is still going strong as my sidearm for use in confined spaces. If the Gecko supported straight Talons then I'd probably have replaced it by now but it doesn't so the Firestrike is safe for now.

Persepectives:

It was great to be back in the field with my fellow foam flingers. I think a lot of us are getting back into the swing of events with some problems with rules communication and just general low energy in places but that's to be expected after the system shock that has been COVID. There are a number of technical challenges that have cropped back up that we need to get back to solving - particularly the motor heating problem - and that will give us the boost to get back to iterating and developing. Above all, the community spirit remains strong, we're all still looking out for each other and we'll be seeing one another more frequently as the tide recedes and events spin back up.

Final thought: I'm really going to need to look at my sub-130FPS equipment at some point because I just realised that I've spent 18 months solely focusing on the higher end stuff because of the way games have been run over the last year. Yikes!