If you like my work, buy me a coffee:

2024/02/15

Elite Colourway - Plate Carrier First Test Fit

I opted for the Invader 6094 plate carrier in the end instead of waiting for the Condor Operator plate carrier to come back in stock. The two are very similar in their design insofar as they use large hook and loop panels layering things up to allow it to be taken on and off. You've got front and back panels joined by a cummerbund around the waist with the shoulder straps forming channels for water, power and other lines to be run from the back.


I tossed everything very quickly on the dummy as a sort of preview. In its stock form, it's designed for a much larger chest than mine so that will need some work. The dummy's chest is 38" and you can tell I could readily fit it over the top of the other vest I already had in place. The slack in the cummerbund panels is what's causing the side pouches to swing out. Resolving that lack of tension will be key to this being manageable.


It doesn't look like much but the cummerbund panels tuck under the loops in the back. Normally, those would be linked using a threaded series of eyelets to create a quick release feature. I've brought the edges of the cumberbund panels together to reduce at least 6" of girth. I've then tied the MOLLE of those panels together and fixing them down under the Velcro panel. That should hold it down and it's now nice and snug and tight.


With the water carrier on the back it sits a little lower down the back below the vest. There's nothing on the skirmish belt at the back so it won't interfere at all.

It needs more panels on the plate carrier to cover the black. In particular, the black shoulder straps need some covering. I'm not sure what I'm going to go with there. There are two options there. The first would be a Velcro panel that would let me add patches on. The alternative (and more likely) option will be two add some linen sheaths over the straps in blue or orange. That should then break up the black while also keeping the roughness of the Cordura from my neck. Bonus points is that it's a wicking fabric so it'll be cooling, too.

I've tried the carrier with the skirmish belt and it works pretty well. I've not managed to add the 40MAX shell carrier or the holster to that just yet. It'll probably be the next few steps I suspect. Then I'll come back to the plate carrier and add the neck guards along with the administration panel I'm going to need above the mag pouches. That will need a design spec of its own.

2024/02/06

Elite Colourway Load Out Progress - Hydration Bladder

Long games require the squishy meat sack operating the blaster to be replenished. With a large equipment load and running about all day, you're going to need a lot of water. The back of a vest is usually a large spot that's left empty since it's harder to reach behind you to grab stuff that's placed there. Sure, you could pop spare mags for team mates there but it's not always guaranteed you'll get them back or have folks to share them with. Sure, you could cover it in Velcro and then patches but surely you could manage do both and make use of the space.


Enter my MOLLE mounted hydration bladder. Containing a full 3L water bladder and hose, between this and the 1L bottle that will sit on my skirmish belt, it should give me enough water for a full day's play. The MOLLE tape is entirely loop tape so there's plenty of footprint for patches to be mounted.

The bladder itself is hung from the Velcro closing loop sewn into the area just below the closure flap.


The pouch then contains two pathces of MOLLE mounting to secure the pouch to the MOLLE panel. Considering that 3L of water is 3kg and it has a liquid inside, that's a lot of shifting mass that needs to be properly secured. It's unusual that I won't just let a thing hang off a single MOLLE mounting panel but this is unique in terms of equipment hence the unusually secure attachment.


Next steps on this one will be to find a hook to clip the pipe hose into on the front of the vest so I can access the hose when the vest is worn. They're available via eBay usually and pretty handy for securing ready access to water. I might also create a hose cover for the pipe itself using some orange waterproof nylon. The clear blue of the bare hose looks a little weird over the fabric of everything else. Pipe covers tend to break things up by having a bit more of a wrinkled surface texture while bringing a splash of bright colour over what will be the black of the vest.

2024/02/05

Elite Colourway Load Out Progress - Skirmish Belt and a lot of pouches!

 With uni finishing, I've gotten a better work/life balance and more time for hobby things. I've been spreading my personal project stuff between sewing shop orders. While that does mean more sewing thread changes for the orange and white thread on my project, it does break the monotony of sewing black all the time. The shop has basically paid for all the materials for this project at this point and is going a good long way to securing the blasters that I'm going to eventually pair with this lot, soon, too.

Skirmish Belt


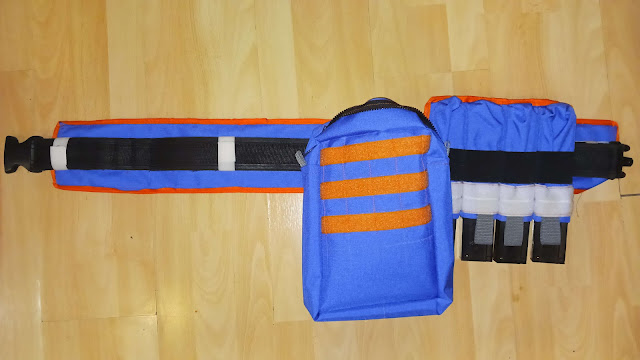
First, the Skirmish Belt. With the friction fit Talon holder positioned so that my knee doesn't occlude it when kneeling, it sits next to my zip dump pouch. You can see why I don't do the zip pouches as a line item in the photo as they're an arse to get to sit square and the corners are always inconsistently shaped. However, this will do the job. I'll add a nice little bit of white shock cord to the zip to bring out the theme colours.


Just a few demo shots of the skirmish belt set up. You can see some of the threads where I had to take it down to replace the internal hook tape on the padded spacer mesh panel. The idea is that loop tape is going to be sewn to my duty belt and then the skirmish belt will only have to attach to that and the front two loops of my trousers to remain in place under load. We shall see. The belt itself is my old Viper belt, holding everything together for the moment. I might invest in a new one or even see if I can find amore appropriate colour match.


This is a better shot of the friction fit mag holder. It's probably the first time I've said that a friction pouch is safely rated to be used in the inverted position. Sadly, getting colour matched flat elastic remains very tricky in the UK and the options were either white or black. I opted for black since white would have dommiated the panel if it went out to the full 100mm. Between the grey tabs and the black, I think it breaks it up nicely. Then the edging tape offers a solid Elite style tie in.

Magazine Pouches:

Now for pouches. Lots and lots of pouches.


There's not much new here. There are 2 Talon hex stacks (2 wide, 3 deep) and 1 high capacity Talon pouch with 12 mags in. They're presented on an olive green vest while I wait for the black tactical vest I've ordered to arrive.

Not pictured is the prototype 40MAX shell holder that's sitting under the arm bit here. It occured to me that I'm going to need some sort of administration pouch with a Velcro loop tape fronting to hold my mag flaps open during use. I'll have a think on what I need out of that pouch. It'll likely just be a slot panel for my SD card holder, maybe a slot for some snap grenades or similar. Nothing too bulky since it'll be right up under my chin and no-one wants a snap grenade to the face.

2024/02/02

IKEA SKADIS Pegboards - Command Strips are Fickle Beasts!

 Never let it be said that I don't put my equipment on the line to test new things. I wrote in this post about how I'd used Command Strips to mount my peg boards to the wall in an effort to avoid putting holes in the plaster board. It worked well for a few weeks and then this:


Bugger.


Everything else was fine but the Gryphon caught the worst of it. The top board which was carrying the most load had come away from the wall and went down with an almighty crash.

Repairs:


I tested the Command Strips and hoped they would be enough. They were not. That means I needed to go to rawlplugs and screws. Your specifics will vary based on your walls but this is internal plasterboard wall so a rawlplug and screw is more than enough.


Yellow rawlplugs and a No 4 screw into each spot fixes it in place and then it's possible to remount the boards securely. I've secured both blaster boards using this method now. The Command Strips holding the LARP weapon displays to the wall on the other side of the hall are holding fine. I suspect that's because they're much lighter than blasters.

Now to work out what to do with the Gryphon...