If you like my work, buy me a coffee:

2021/11/28

End of Season Equipment Review - 2021

Yesterday at Splatoon was probably the last high FPS (and possibly even any game) of 2021. With winter approaching and the winter pressures building in the day job, it was time for a chill event to finish off the year. My usual After Action Report is over on BritNerf itself but here contains a full equipment review for my high FPS load out and all the things that I need to fix over winter. I mentioned in my previous post that this rig was sort of patched onto another rig that was designed for a LARP character and as such it wasn't entirely fit for purpose. With games starting up again and the high FPS scene here in the UK really starting to get it's own momentum, it's probably time for some upgrades to get this thing to work.

Gryphon:

We'll start with blasters because folks seem to think these are the centre piece of any load out. I'd disagree: they're maybe 20% of a load out once you factor soft kit and magazines but that's a discussion for another time. The Gryphon continues to serve. It just does. It needs some lubing on the gear mechanism because in the cold yesterday, it was being a little sticky but frankly this thing just fires. No muss, no fuss. The only thing I'd like to do is some sort of lock out cap on the red dot sight so I can get some actual use from it. Right now, I'll change the CR2032 button battery on the back and then it'll switch on in my back and the red dot will go flat in my bag. I need to find some sort of way of having a lock out block that slides over the top to protect the slide switch. Other than that, it's just trucking along fine. On 2S, it fires sub 130FPS which means I can now full convert to half lengths.

Tempus:

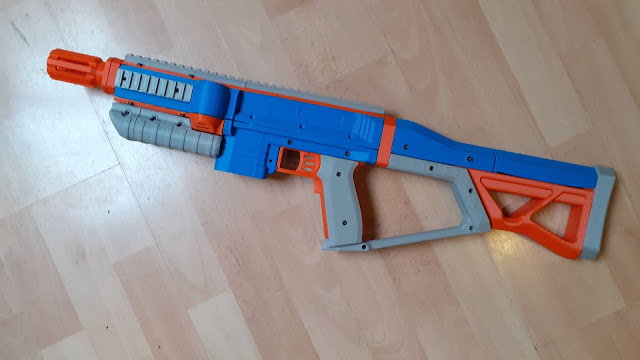
The Tempus is still the new comer to my rig and it's a new design of blaster in field so it has it's own bugs and quirks. My favourite at the moment is that the rev trigger has a tendency to work itself loose. All day yesterday, I would remove the trigger at the end of each game and stick it in my pocket to keep it safe. The problem there is obviously if I needed my hands for something other than supporting the blaster grip, I'd lose the trigger into the underbrush and the blaster would be useless. 

It turns out that wasn't what took it out of action yesterday. I forgot my LiPo alarm for the pack which meant that the cold (5C, 41F) did a number on the capacity of my packs. The pack ran dry after only a couple of rounds. It dropped to 3.5V per cell but was rescued once I'd warmed the packs back up to a more normal 22C in the flat when I got home. I'd left the spare at home so I was back down to using the Gryphon after that point. The front end of the Tempus itself needs rebuilding with new motors and wheels that are properly installed with tolerances and shims used. Two in three of the darts fired would either whirlybird or decap. The former I would attritbute to the lack of wheel balance and the latter to the fact that Gen 2 Worker darts are slightly questionable in their quality. I should also seriously look at reprinting the flywheel cage to clean up the various soldering iron marks and what not that have appeared over time.

Knee pads, shemagh, boonie hat

These three pieces are of soft kit are just fine. My Alta Contour knee pads keep on doing their thing. I had to readjust them for the first time in years yesterday but that was only because I'd played with the straps between events. Once I'd worked them back into the sweet spot, it was like kneeling on clouds again. Sometimes I think I should put them in the wash to see if I can make them look like the nice tidy clean versions that I sometimes see on other players. Then I remember there's like 5 years of Nerfing history baked into that mud and I'm not going to compromise that.


The new scrim net shemagh works pretty well as neck protection. I think I might swap it for a more green version than the current olive/tan but it keeps my neck covered while breaking up my outline.

The boonie hat is a great way to keep the elements out when I'm not wearing my main helmet. I could look into maybe adding a camera mount to it for recording reasons but it is fast and light so I'm not sure if I should worry about that.

MICH2000 Helmet:


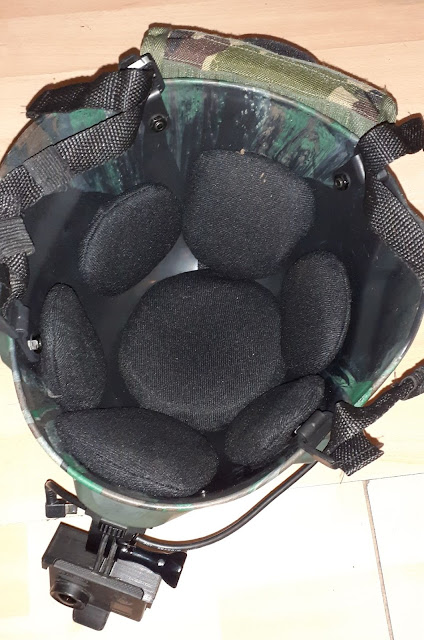
A new addition now I'm back to playing is a MICH2000 plastic clone with my camera mounted to it with custom power bank at the back. Dipped by the wonderful folks over at Monkeytron Collective and finished with a matte lacquer, this is mostly a fashion piece to top off the rest of my equipment. There's a custom power bank mount at the back supported with Velcro and zip ties while the cable runs to the front to expand the power of the Firefly 6S up front. Over winter, I want to put some DPM cable sheath over the top of the leads and then probably add a torch mount to the helmet itself to let me film both visible light and hopefully IR light, too. I also need to add something to whatever succeeds the 18 pattern webbing to let me carry my SD card holder close to hand to let me swap it over on the regular. Perhaps I could build an SD card holder into the torch mount itself?


Inside, you have this lovely padded system which was nice and warming in the cold whether. It beats the old hard polystyrene that you get in FAST helmets but I'd be wary of it in the summer, getting soaked with sweat and the like. I might also see about swapping the straps out for something greener to complete the look.

Reserve Magazine Friction Fit Pouch:

I've complained about these before with the press snaps being sub-standard. I need to fully refit these pouches which will mean stripping the fabric back and resetting the studs. I'm mostly complaining here again so I remember to actually do it this time.

Gecko & Gecko Holster:


I got a Gecko printed and it's wonderful in hand. It took some fettling to get it to prime smoothly (had to sand some bits) but it works otherwise fine. I've got two spare magazines, one of which is held in a dedicated friction fit magazine holder there I can top it off and swap it with the other one. I actually got tags with this yesterday in close confined areas. It was nice to have a closed loop there - I first realised the merits of spring primed pistols back in Splatoon's Kill House maze years ago and now I have a dedicated closed in side-arm for doing just that.

I still need to do some work on the prime retaining mechanism to get it to settle in place when firing. Currently, I have to support the back of the slide when firing to keep everything in place. There's just a little bit of filing that needs to be done on the green part of the front slide to apparently help that hold in place.


The Gecko holster itself isn't as good as I'd like. On paper, it should be dead easy to build a Gecko holster but I'm really finding it tricky to get a design I actually like. In the terrible photo above you can see the current design. It's a magnet release top flap with a box holding the shape of it in a half-drop configuration. The half drop itself is perfect but the return is slow and cumbersome because of the shape of the holster. I'm honestly tempted just to stump for a fully tooled leather holster for it because I think that might work out better. I'll have a think over winter and see what pops out. You can see the magazine pouch behind it. Obviously, lying flat the two items occlude one another but if you wrap the skirmish belt around then in 3D space things actually work.

Skirmish Belt:


Skirmish belt remains solid as a concept, it can stay. Once you set it for the day, you've got a load out ready to go for light skirmish work. I think the contents of the belt will change but the general concept itself is here to stay.

The water bottle carrier pictured above is an old Maxpedition version and I think it might be time to replace the bottle itself and maybe find a green or DPM version to go on the belt so it doesn't stand out as much. The dump pouch is working fine. It can carry something like 400 half darts and not be over full which makes topping off during the day very, very easy. I experimented with putting grenade holders on the front of it and that didn't work out terribly well.

AirTac Grenades:


We need to talk about the AirTac grenades. The principle is sound but the product itself isn't worth the £20 asking price. I've already lost one to damage from posting them over filing cabinets at Superstore and the design of the head means that don't always land cap down to strike and set off the charge. Without an open source file system, we're stuck with them so any alternative that can be developed I would happily support. The printed MOLLE holder clips not only require tools to install but also will break after light use, even if they are placed up high on a rig to protect them from the worst of rough and tumble.

Going forward, my plan is to create a MOLLE mounting panel that will emulate the effect of the plastic holders including the safety feature. I will also put a slot panel in behind to carry loose charges because one of my biggest problems with these grenades is finding an effective way to carry the charges. I spent a good deal of yesterday not using them because I couldn't readily locate my charge bag on my vest.

To be clear, when they work, they work great but there's a lot of improvement to be made and for a closed source product, this isn't a sustainable ecosystem I want to buy into as a consumer.

Communications:

Reposting the note that my broadcast radio requires a new pouch to secure it in on the haversack so it can be protected from the elements. I also need to buy a new headset and then test it with my two push to talk modules. I don't like the push button PTT that I have on the rig currently so I want to verify that my round membrane PTT is actually faulty or if it's just the microphone on the headset that needs work.

Otherwise, I need to print a nubbin that will let me reach the volume knob on the 888 itself a little more readily because currently it's an arse ache to reach around and turn it on and off. I don't know where the nubbin ended up but it needs replacing. Using two radios is also working fine. I can use the 888 to receive and with the long aerial, it gets a good signal over a wider area. The UV5R can then be pulled off my belt and it's advanced features with screen used in hand to good effect.

18 Pattern Webbing & Haversack:

Way back in the depths of 2019, I realised I would be playing a LARP character that wouldn't have ready access to safe areas or resupplies during weekend long events so I developed a haversack based on the British 37 pattern webbing haversacks for just that purpose. It's MOLLE mounted and can be fudged onto one of my 18 Pattern Webbing Harnesses to allow me to carry everything I need for an event. It might slow me a little and make me a slightly bulkier target but I can survive a whole event with this thing on my back because it carries ammo, smokes, water and food. With the rise of proper Long Games on the UK's High FPS scene, this sort of carriage is becoming more necessary. The Tempus is a hungry blaster and needs a lot of ammo to function. The issue is that this was always a fudge, grafting it onto a webbing harness to try and make it light without really considering the down stream issues.

First, there's the need for repair. The PALS leg holding the sack to the webbing snapped yesterday because I used B-grade thread to put this together. I'll often use B-grade stuff on my own gear to save it going to waste and the compensation tactics I use don't always pan out. Either, this is a quick repair but there is the possibility I can take the bag apart and add some new features that might be quite handy.


The main straps vertical straps are host to the water and radio lines with the single point sling mount over on the left hand side there.  If I'm to replace this, I'll probably create dedicated lines that let me seperate them out and hold them more steadily than the current configuration. Then a big old MOLLE panel at the back will hold the haversack in place. Currently, this jacket with all the various straps can be a little trickier to get in and out of than a traditional vest. I'm just chucking photos up here for future notes and comments. The actual spec of whatever combat jacket or vest I come up with in future is the subject of a later post.

I think that covers most of the equipment worth talking about. My new gloves arrived the other day and served well, they're a direct replacement for the old Blackhawk knock offs that I got from ebay. They served me well for 4 years or so. Going up to the Mechanix gloves would have been a Nice Thing (tm) but for now, I think the cost wouldn't be worth it. Boots worked fine, DPM work shirt and Goretex jacket all kept me warm and dry over thermals. In all, it was a chilly but fun day and I've got lots to be getting on with over the winter time.

2021/11/18

Winter Clash of BritNerf - Brief Thoughts on Equipment

Winter Clash of BritNerf was over the weekend of 12th November and consisted of a variety of events at three different venues. I attended two of them: Superstore and Invicta Battlefields. My After Action Reports for Superstore and Invicta can be found over on BritNerf that detail the game play and my general thoughts on the event. This post briefly makes some notes about my equipment for each event and how it panned out.

Superstore - 12th November

Superstore is an old department store that's been converted to an airsoft arena. Close sight lines, 130FPS cap and quite a bit of CQB action. I found the Gryphon on a 2S snuck in under the cap so I was on short lengths for the full event.

Tactical Boff is watching you...
Major equipment changes from my last post include the addition of a full linen shemagh. It's great to be back in the soft coolness of proper linen on my next. With the FAST helmet and camera combination (as long as the SD card remained empty), it sat under my chin nicely and kept my neck protected from incoming darts nicely.

 I also swapped up my eye protection to the lighter BOLLE Viper glasses rather than my older Tracker goggles. The result was a much better experience with less fogging and general problems. Sure, the event was REALLY yellow for all of it but I took two direct hits to the lenses and they didn't struggle. I think I'll be keeping them for future events.


The old 2018 pattern vest is actually still working really well. I think over the winter I'll need to make myself some Talon pouches now that I'm pretty much operating solely on short darts because the old magazine pouch dividers can only take me so far. The proper tactical shirt I have for under it is working nicely and has plenty of pockets and space for patches.

"STAY STILL THEIR VISION IS BASED ON MOVEMENT" - SpectreN7 on this photo
 The AirTac grenades pictured with the orange caps on my vest continue to be a pain in the balls. They're fragile but when they work, they work really well. I feel there are a lot of improvements that could be made with them but they did work to clear rooms nicely. I need to make a proper holder for them, though because the 3D printed one they come with is terrible. I've only used it for two events and there have already been breakages on the clips. I need to find a way of carrying the 'nades and the charge bag on a single panel that I can move around as I need it.

I might also want to invest in some black knee pads if indoor games are starting up again on the regular. I'm currently relying on not having to kneel much but venues are getting more and more varied so I want to be able to protect my knees as I get older.

Finally, the Demolisher rocket and MEGA dart holder is showing it's age and needs replacing. I need a way of carrying spare darts for my shield busting side arm that doesn't see them get squished. It's something to put on the design list.

And yes, there are jokes to be made about playing amongst the corpse of late stage capitalism with this arena...

Invicta Battlegrounds - 13th November

Going back to London between two events might not have been the best idea but I wasn't lugging two sets of gear around. Invicta is a completely different dart game to Superstore. 300FPS cap, outdoors and in the woods. It's a unique venue that lends itself to a different game type than other high energy fields but I still rocked my standard green kit.

"What this situation needs is more smoke..."

This is one of my favourite event photos for a while. We're assaulting a fort that's behind that cloud of smoke. You can see the arc of live pyro mid air from other players and we wanted a dense screen to advance under. We'd cleared the woods to my left of skirmishers and were due to make an advance on a heavily defended position.


This shows off my current gear quite nicely and the theme and look is consistent. New additions are the Gecko holster for my shiny new side arm. It wasn't in service for this event but I took it along in the holster with it's magazine pouch so I could get a feel for where it needs to go. Honestly, it might have to go onto a drop-leg. The draw was a bit meh with it on the battle belt as high as it is and it got caught on the mag pouches. You can also see the dual stage Tempus in this photo which is a massive upgrade to the Gryphon. It still needs some work to get it dialled in but it did a great job on the day. The photo does show some problems with gear remaining in position, however. The current core of the system is webbing straps and those will bend and deform which can mean things get in the way.


This shot shows some of my difficulties with the current set up. This rig was developed in 2018 originally and then patched onto for an event in 2020 where I needed to be in the field for up to 72 hours at a stretch for a LARP. While it's light over the work shirt, there are tubes, pipes and straps everywhere. I've tightened it up as best I can but it's still a little all over the shop. A radio pouch for the transmission radio and probably a new headset are in order since my Bowman appears to have stopped broadcasting. The haversack is a bit loose on the webbing and moves when I run. Carrying an entire event's worth of fighting equipment on me served me well, rarely did I have to return to the safe zone for anything. Food, water, pyro and ammo all in one place works great but I think the concept needs to be refined. I can dump the top rig still to give me the skirmish belt for shorter games but at the same time, the Tempus is a hungry beast and probably demands more than just the two basic magazines I have on the lighter version of this order.

I've been considering the design of a completely bespoke tactical vest for myself to include all the wiring and tube pipes that I think I need. I can then put the haversack on the back and maybe look at making cloak/bedroll carriage a little more intuitive. A pocket for stowing my head set when it's not in use so the wires don't get destroyed in transit would also be handy. I will thrash out a full design brief over the winter and hopefully go in 2022 with gear that has learned the lessons post-pandemic now events are starting up again.

Oh and the boonie hat was necessary because I'm still working on my power supply situation for the new helmet and camera system.

2021/10/13

Superstore Kit Review - I don't always wear green!

 I had the pleasure of returning to 130FPS indoor games on 2nd October with Games of Foam Superstore event at Echelon Airsoft in Gravesend. Despite a rainy evening and going around the block twice, I found the venue in the end: a deserted old Debenhams department store. With COVID killing off a whole load of British High Street stores, there's a lot of old units that aren't getting any use. The guys at Echelon took the initiative and snapped up the lease on this unit and the result is a 3 floor venue across the shop floor, the warehouse and the office sector. It really is a venue like no other. I'll see about doing a walk through/commentary video on it with my GoPro footage at some point but for now let's talk gear.

With the day job being full on at the moment, I didn't have much time to fully interogate my equipment for the event. Most of my development effort in the last 18 months has gone into my high FPS stuff but I have acquired a few things in the background to modify my look.

It's a little bit of a 2018 throw back using my big pattern vest with my 18 dart magazine pouches. Now, these will take 6 Talon magazines but they're not ideal so on the advice of n_g I popped a Worker flywheel box at the bottom of the 'ready' pouch so they lifted into a better position. The other three pouches can then take other magazines that can be swapped around as needed to keep the 'ready' pouch full. That way, you've got 6 Talons and 1 in the blaster ready and during respawns or general down time.


Now, the indoor black and blue rig is designed to be a little more friendly than the out and out green and camo so there's plenty of space for Velcro patches both on the undershirt and the vest itself.

I hung my MkIV Blastersmiths UK drop-leg holster from the bottom of the vest to better secure it than if I had put it on the belt. Inside was a Cyclone shock for shield piercing. In an environment as tight as the Superstore, you're going to have problems with shields in corridors so being able to put a MEGA round on target with your side-arm is very useful. Normally at places like Bristol Blast, I'd have time to call for support to bust the shield but the tightness and faster pace of an old department store means you'd want your own organic firepower on hand.

Elsewhere, I had a pair of Airtac ring cap grenades for room clearance. I didn't get much use out of them and one went AWOL but I think it's case of letting the system mature in play. They have a particular knack in how they're thrown and pulling them off the vest for use takes practice. I also think only using 1 cap instead of 1 cap and an entire ring would make reloading them faster. I'll be using them at future games and report back.

On my head, I swapped my FAST helmet for something softer: a US Army style field cap and printed a clip to pop it on the beak. I think I might find a way of running a cable back to a USB line that can plug into a power bank because the onboard battery did struggle a little. One of the advantages of a FAST helmet is you can bolt a power bank pouch on the back and call it done. The problem is that FAST helmets aren't the best look - they're a little 'warry' and have that 'I bought this at an Airsoft store' look about them if you're not careful. The images produced on the hat are pretty stable and with an adjustment to get the angle correct, it produces good footage. Bonus points that you can fit a BritNerf patch to the back of it!


Photos courtesy of gamesoffoam.co.uk

You can see the full outfit in the photos above and it works quite nicely. It looks the part without being overly agressive. If I commit to the full transition to Talons, I'll sew up some Talon Hex stacks in the correct colours but for now, the converted gear is working well.

This is the blaster itself, a 3D printed Tempus. Like the rest of this rig, it requires a lot of work to bring it up to battle spec. It was fun to use for a single round but the printing quality problems in it mean the friction fit of the magazine well is too tight and the trigger system is very, very heavy. This isn't a design issue, it's an issue with the meat servo operating the printer. The handling and design of the blaster are fantastic. It has a real assault rifle feel to it, it's great around corners and it feels solid in hand. The length is perfect and it's possible to customise it by adjusting the various length plates at the insterface and buttstock plates. You could also opt for a shorter muzzle brake for an even small former factor. It's not an SMG like the Gryphon, it's a full factor rifle and I prefer it for that.

I'm planning to re-print all of the receiver to reduce the amount of warping present in the build. Hopefully, that will also reduce the amount of friction on surfaces because the original was printed with a 0.5mm nozzle and probably with too much squish. Hopefully, that will be enough to make it a servicable rifle. The next steps would then probably be to redo the triggers so they have a better surface finish for lower friction.

It's weird being back at 130FPS with a very different set of design considerations. You're closer to your resupply points, you're running faster turn around games and generally it has a faster pace to it. It has different kit requirements but it's a nice change from the green and srsbiz that can go hand in hand with the high FPS stuff (by choice, not by requirement for higher energy stuff). My next 130FPS game will likely be at the end of November so I've got plenty of time to get things in order. Lots to think about...

2021/09/14

Scrimming: No, not the gaming sort...

 Scrimming in this context refers to the art of concealing your self using fabric pieces and, in the case of field work, vegetation to enhance your concealment. I don't currently have a proper stock for my Tempus so my old Stryfe Raider stock is going to have to do until I can arrange an alternative. The problem is that it's bright bloody red! That's fine if you're running around a sub-130FPS field but Invicta Battlegrounds is a forest with a side-helping of forest. Blending in and trying not to get tagged is the name of the game.

To the red/green colour blind, that might not seem like too much of an issue but to me it's both shiny and bright red.

I cut up and old scrim scarf into chunks of fabric to be used to cover the back end of the stock. Nature has no straight lines and shiny things catch the human eye to movement as light reflects off them. The softer lines of the dull fabric make concealment much easier.

Cut up some lengths of shock cord to act as anchor points for the scrim net.

Tie them into position to create some anchor points.

I'm not entirely sure it worked. The end effect is there but I think a different approach might be useful. Scrimming is always an ongoing process so I guess I can fettle and work to improve it. We'll see if it works at the weekend on the field.

2021/09/13

[WIP] Open Source Nerf PCBs are coming!

 I've been in the Nerf PCB game since at least 2016 developing the BritNerf MOSFET board as well as a board for the Stampede when I was with Blastersmiths. Back before the plague, I published a bunch of free to use board files but with real life and the pandemic, progress has stalled.

I've been working on them on and off again since April of this year on a range of boards. With the development of dual stage flywheel systems, I found wiring everything close in on the back of a printed cage and getting it all correct was a very frustrating exercise. To that end, I created a dual stage MOSFET flywheel board compatible with the Gryphon and Tempus when used with Daybreak flywheels.

This is the progress of the dual stage board from first concept through to the latest version at the time of writing (v0.5). It started originally as a single FET version but I quickly realised the utility of two MOSFETs, one for each pair of motors. I'm doing a lot of background work on different motor combinations for dual stage and some of the big 132 and 180 can motors draw a lot of current. By having multiple FETs, you're not stressing a single component past it's limit and it probably will work out cheaper to install. The latest version can be powered from either end after I discovered the need for that feature in the Tempus.

v0.4 testing rig, note the lack of forward contacts in this version

Testing these systems is fairly easy, you just chuck some motors into a printed cage and drop the board on the back back. Solder in a switch and an XT 60 plug and you're good to go. The obvious draw back here is the need for all the cans to be the same length. That certainly isn't the case in my current generation of Tempus build so there needs to be a solution for that.

Enter my MOSFET motor span board. The most recent version also has expansion connectors at the front to allow for daisy chaining boards forward. It is then possible to hook up a simple motor span board (see below) for dual stage motor systems with different can sizes. It might also be possible to link the trigger pins of two boards together and use the expansion slots at the front to link two MOSFET boards but I've not tried that yet.

The problem with extant motor MOSFET boards is they use smaller packages than really are ideal. Nerf motors draw a lot of current and even if the silicon in your MOSFET can handle theoretically high currents, the package it's in might not. For example, my go to N-channel FET is a IRLB3034 which, on paper, has a maximum current of 343A. The problem is that the TO-220 package it's mounted in is rated to 195A. That's still a lot of current but it can handle that because it has a giant heat sinking tab in addition to a much physically larger package for dumping heat out of. Smaller packages don't have that luxury and are prone to failure. Yes, it might look pretty to have a small SMT package with neat flashing LEDs but through hole technology means you get a durable, rugged board that won't fail. The BritNerf MOSFET board has been in circulation for years and is a reliable, dependable platform. I guess my HvZ heritage shows here: stuff cannot fail because the cost of a single failure is absolute. But that's a story for another discussion...

Itty bitty FTW motor board

And for all those FTW fans out there, these boards are a simpler way to install motors into an FTW build. I have a Grass snake powered by Krakens that are going to get one of these because it's a mess in there and it needs tidying!


Not everything goes to plan, however. There's an inconsistent bug in this one particular board and I need to properly hunt it down. Even though it uses the same library component as everything else, the Gerber files don't always produce a slot and often create a hole instead. This is the more traditional motor span board with an optional XT60 connector and input/output solder pads for daisy chaining multiple stages or just having powered supplied to one end of the board rather than the other. Oh and it has a diode mounting position because some folks have requested the ability to have an 'after-glow' effect that uses the back-EMF of the motors as they spin down. So that's neat...

I've run out of FETs and diodes so I'll have to wait for those to arrive before I can test those boards. In the mean time, I'll get the FTW  board tested and probably strip out the front of the Tempus ahead of mounting those boards. In particular, I'm going to go back to the circuit diagram and see if I can daisy chain those single stage FET span boards.

Once all these files are ready, I will publish working Gerber files as well as the EAGLE files on my GitHub on a Creative Commons 0 or Public Domain license for folks to do whatever they want with them for free. I've already got a distributor ready to go for these and I think a few more are coming on board. However, if folks feel they want to order from JLC PCB or another fab house directly then they can just feed the Gerber files without need to pay a license fee to me to get their boards made and posted direct to them. Open source is best source.

2021/09/12

BOLLE Tracker Goggles Update

 Sometimes projects take a while. Well, this case it's only been 6 years in the making. Back in 2015, I reviewed my current eye protection of choice: the BOLLE Tracker specs with yellow shooter lenses. They're great insofar as they're wrap around and with the elastic band, they hold in place even during the roughest combat.


I commented at the time that the white and black logo strap was a bit much and I needed to do something about it. It's only taken 6 years but I got around to it this weekend while preparing for Invicta Battlegrounds on 18th September.
I took a scrap of DPM cotton drill fabric and measured 3 times the width of the strap and double the length. Capping each end with a 15mm seam and then sewing it camo side to camo side, I could turn it inside out and produce a nice cover.

The main problem was that back in the day, I glued the strap in place. In order to get the cover onto the strap, I unpicked the factory stitching, threaded on the cover and replaced it with a few stitches from my #60 nylon thread which is probably tougher than the OG stuff.

I've washed the lenses thoroughly and added a layer of dish soap over the top in an effort to stop them from fogging. They're good lenses but I'm worried the amount of scratches from wear and tear is starting to provide focal poitns for moisture to start fogging. If this doesn't work, I'll replace them. I can't really get on with mesh, it darkens the field of view too much while causing glare in bright sunlight conditions. The UV proof coating of the Trackers is also a value added feature.

I'm on leave this week so between sewing BoffTac orders, preparing for Invicta on Saturday, I'll probably see about documenting some stuff around a 130FPS blaster I'm working on and designing some kit for my first indoor war in 18 months.

2021/08/09

Post Clash of BritNerf 2021 Kit Review

I had intended to do a 'Road to Clash of BritNerf' series but life over took me and client orders meant documenting and working on my own equipment took a back seat. Instead, here's a quick review of my equipment from the weekend. My full after action report can be found over on BritNerf while this post focuses on my equipment and load out.

Skirmish and Combat Order

This event proved the concept of Skirmish Order and Combat order beyond a shadow of a doubt. For the short games, it was great to have the full rig at respawn and just grabbing full mags from pouches and swapping them with empties. With any lulls in combat you can then top off from your drop pouch to keep your darts topped up. 

I need to act on the notes I made in the last update about finding a better way to anchor them together. Currently the snap fastner and webbing approach is doing well but it does need a better way to do things.

Skirmish Belt Update

I've updated the skirmish belt to put an adjustable 50mm buckle directly on the panel rather than relying on the Velcro belt that's already there. It makes it easier to take the belt on and off if all the games in a given day are going to be short games. While threading it into the Viper belt remains an option, it's one I'd only use if I expected to wear the belt for long periods of time. I've sewn it in such a way that it's easy to revert back to the old method so I'll try it out at Invictus next month and see how it fares.


Adjustable 50mm belt closure on the Skirmish Belt

 You can also see in the photo where the changes to the magazines and dump pouch positions. Part of the dump pouch overlaps the magazine pouch and it works because the curvature of the body pulls the back of the dump pouch away from the mags. 

A Gecko is coming to replace that Firestrike, too. With the Tempus out of action, however, there's little pressure to upgrade because the Gryphon can engage without needing an MED sicne it's clocking 135FPS at last chronograph.

Zip Dump Pouch Alterations:

I found the zip pouch was pulling away too much and at risk of spilling so I've added another pair of PALS legs with Velcro to the back of it. The joy of being on my reserve machine is that it has a shorter free arm which makes sewing things like this much, much easier. You just put the throat of the pouch into the short free arm and sew. It would be a much more difficult proposition with the flat deck of my main machine. 

The pouch itself now fits at the 1 o'clock position just below the right hand set of magazine pouches in the full combat order which allows me to feed ammo with my off hand into magazines nicely and easily.

Friction Fit Magazine Pouches

My friction fit magazine pouches did a great job of keeping a small amount of ammo close to hand for short bouts. I have opted to move them off 1 o'clock position and down to the 3 o'clock. I found early on that kneeling or crouching with the battle belt secured around my Viper belt pushed magazine lips and my Firestrike into my ribs. In having it low, they were very accessible and stable but I had to move them further round in order to prevent problems with my legs interfering with them. It doesn't help that I've had to use an alternative supplier for press studs recently which means the PALS legs on the pouch don't secure as well as they have historically. At one point, the pouch came completely loose when I was crawling through a bush which is unprecedented. I've sent an angry email to the supply about quality and swapped the position of the dump pouch and mags accordingly. The other benefit to moving them to the 3 o'clock position is that they're now far more accessible when the full Combat Order is in use.

Bangers and... er... mash? 

I built a specialised breaching bracer ahead of the invent to go on my right arm. The intended use was as a second mag in a stack to pancake against a wall and still be able to access 'nades, bangers and, if necessary, a lighter.


A 20mm piece of elastic to allow carriage of a MkV Thunderflash pyro

It's not a bad piece of kit, all told but I didn't use it. The site was far too woodland and far too little buildings to warrant a specialised piece of gear for room clearance. For the most part, buildings were ignored and where they were in play, they were cleared using volume of fire and other traditional methods. The pouch consists of three pockets, two for my snap ring grenades (which produce a lovely bang and flash when they go off) and one for spare snaps and a lighter in the event I need one for the attached MkV Thunderflash, too.


I think I could make a small pouch for them to sit on the Skirmish Belt so I've got access to them all the time for lower density operations. For somewhere like Splatoon where easy access to bangers is more important, I'd probably use the bracer.

Honourable mention to the Enola Gaye Flash Grenade 3.0 that I got to lob courtesy of the game organisers at CoB. It was a lot of fun to have a WP40 sized pyro go off after 6s of having lobbed it into the netting above a building!

Elsewhere, my pyro game was strong. The 4 smoke pouch that I made for the Combat Order served brilliantly while good old fashioned MkI pockets did brilliantly for Skirmish Order. The DPM work shirt and trousers I use have big, useful pockets that take smokes quite nicely. I might consider a smoke pouch for the Skirmish Order but it's not exactly a priority. The haversack contained my spare pyro and ammo just fine.

Trouble in Gryphon Town

I had an outright failure that nearly put me completely out of action during Saturday. My Gryphon stopped firing for some reason and upon opening it up, it was discovered the printed gear on the pusher mech had failed.


 Now, the Gryphon trigger throw is a great feeling but printed gears have made me nervous for a while. I was lucky enough that a fellow BritNerfer was kind enough to lend me a gear for future use but I'm adding spare PETG printed gears to my equipment load for future events. The pusher also needs more frequent cleaning because I found a lot of gunk building up in there which might have contributed to the problem. There is also a potential problem with the new AK Blaster Mod Talon magazines that I have procurred that I am currently looking into. I need to test them in other blasters before I draw any conclusions there.

I wanted to get the Tempus functional for this event but a problem has crept up with the electronics so I was back to the Gryphon. I'm hoping I can make the Gryphon settle properly with more effective maintenace protocols and not need to replace it with a Tempus but I am very, very ruthless when it comes to equipment failure.

First Aid Panel Updates:

My Leatherman Raptor shears turned out to be a surprise hit and unexpectedly useful tool across the weekend. I was amazed how much use they were and plenty of folks were asking to use them for all sorts of tasks. In turn, that moved my focus to how I carry. I found the slot I created for them in my original emergency to be unsatisfactory and they were at risk of falling out.

I lost a number of gloves from a very gappy glove pouch!

In addition, the glove pouch that uses elastic is a bit floppy now after a few event's use so it needs remaking with Cordura access flaps like the one I built for my medic bag. I'd also like to be able to carry a proper trauma bandage with the pouch. I'll have a look at how I can achieve all of this with the same foot print and hopefully reuse some of the existing parts as I rework it rather than building something from scratch. I could also include a pouch for my Leatherman Blast multi-tool while I'm at it since that comes in pretty handy on the regular, too.

Helmet with power bank pouch

I finally got around to sewing my power bank pouch and attaching it to my helmet. That was great and all except I got to site and forgot that I put my camera batteries and power bank in my medic bag so when I turned my camera on and got no life from it, I assumed it was bust and left it alone. There was a lot of stress coming into the weekend so I think my brain was in "Ditch it mode" when it came to non-critical equipment. As a result, I have a helmet and power bank solution but no footage from the weekend.

Gloves and Knee Pads - Old Faithful Clings On


I urgently need to replace my gloves, the hole in the right one is getting silly now. At one point I put them on and my thumb popped through the hole rather than ending up in the glove. I could sew the seam back, yes but given the palms are worn smooth, it's time for an upgrade. My Alta Flex knee pads are still trucking and I've converted a couple of other players to them over the course of the last few months.

Boonie Hat, Cloaks and Staying Dry

In need of something lighter than the helmet for my Skirmish Order rig, I opted for a Boonie Hat like a number of other BritNerfers. It's a fantastic style of soft hat for lighter work and did a great job of keeping both sun and rain at bay. The best part, however, is the way the brim interacted with my cloak hood which meant the hood didn't come down when running. That's fantastic because it rained a lot but very intermittently. I opted for the cloak over the Goretex smock because the latter is much more difficult to rapidly change in and out of. The cloak can just be unclipped and dropped while the jacket needs to be removed from under webbing and belts. If the rain had been more consistent, I'd have opted for the jacket but we had very heavy downpours between sunny spells.

Communications:

Long Games are better with radios but they come with their own set of pitfalls and problems. I found a loose connection in my push to talk module so I ended up borrowing one radio to transmit with and the other to receive. Keeping a closed channel using the headset is vital because it prevents your location being disclosed from random noise. I would turn the transmission radio on whenever I needed to broadcast and promptly turn it back off.

Going forward, I plan to keep my UV5R radio on my Skirmish Belt for ready access and use the simpler 888 as the transmission radio. I can put the long aerial on it and feed it up the side of the haversack and have it receive accordingly. The UV5R can then go in hand where I can make better use of the greater feature range it offers. One of my consistent problems with radios is pouching them and not being able to get the best from them. By keeping the basic radio on the Combat Order for basic transmission and reception, I can use the UV5R for dual band work. I'm probably one of the few players in the Nerfing world who needs to worry about this sort of thing but documenting it for others isn't a bad shout.